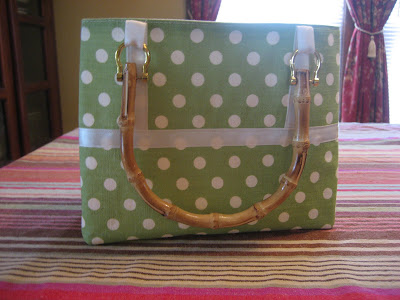
Make a purse out of a place mat!
 How cool is that? I used this tutorial at Little Birdie Secrets, one of my favorite blogs for inspiration and ideas for projects. I found my place mat at Target and got matching ribbon and handles at Joann's. It was pretty simple to make, just make sure your place mat isn't too thick or you might have a hard time getting through all the layers on your machine. It did take me a little bit of time to measure and pin my ribbon and handle on the second side, to ensure it lined up perfectly with the first side. This made a perfect birthday gift, filled with a book, CD, and candy, for my sister in law Lacie. I choose the place mat and handles with her in mind. The possibilities are endless though, and I can't walk by place mats in a store now without envisioning a cute purse instead :)
 I cut four ribbons 8 1/2 inches each and pressed lightly to make them easier to pin on flat. I also cut two long pieces of ribbon the width the place mat to sew across (not pictured).
 Measure and line up the handle in the center of the top of the place mat and mark with a pin. Thread the ribbons through the handle, pin, and sew onto the fabric. Do the same for the second side of handle. Pin your long ribbon along width of placement, covering raw edge of ribbon, and sew along all edges of ribbon. Repeat this same step for the bottom edge of placement, making sure to line up the handles and ribbons so both sides match.
 Press, and then pin right sides together. Sew up the left and right side of placement. I sewing about a 1 inch seam allowance to avoid the thicker edges, and then used pinking shears to cut off excess fabric. You could turn right sides out and be finished here if you want a flat bag/purse.
If you want a boxier bottom, you can pinch the bottom corner together and sew across (I measured down two inches and sewed across). Do this for the other side and hopefully you won't have to rip out your stitches and do this three times like me. I didn't take a picture of this step, but check out the pictures from tutorial to see what I am talking about. Turn right side out and press again. I folded in the sides and lightly pressed to help the purse stand up more on its own.


 A cute spring purse, perfect for yourself, or a gift for someone special.

that is adorable! great job. i may have to try this. :)
ReplyDeleteI thought this was cute when I saw it on LBS. You did a great job.
ReplyDeleteThis comment has been removed by the author.
ReplyDeleteThe deleted one was from me :) I think that this is too cute!! I know Lacie will love it!! Great job!
ReplyDelete